指令内省使 Solana 程序能够在同一笔交易中读取除自身以外的其他指令。
通常情况下,一个程序只能读取发送给它自己的那条指令。Solana 运行时会将每条指令路由到该指令中指定的目标程序。
一笔 Solana 交易可以包含多条指令,每条指令可分别调用不同的程序。例如,在同一笔交易中,程序 A 可能收到指令 Ax,而程序 B 收到指令 Bx。通过指令内省,程序 B 就能读取指令 Ax 和 Bx 的全部内容。
举个例子:假设你希望确保任何与你的 DeFi 程序交互的操作,都必须在同一笔交易中先向你的金库地址转账 0.5 SOL。你可以通过内省机制检查交易中的所有指令,如果在调用你程序的指令之前没有包含这笔 0.5 SOL 的转账指令,就拒绝整个交易。
在本文中,我们将学习指令内省的工作原理,以及如何在你的 Solana 程序中实现它。
交易与指令
在深入探讨指令内省之前,我们先详细回顾一下 Solana 中交易和指令的结构。
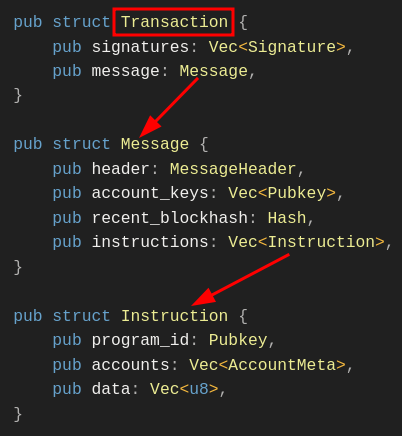
Solana 交易是一个包含两个字段的结构体:message(消息)和签署该交易的签名列表。消息中包含一个按顺序执行的指令数组。
下面的代码(直接来自 Solana SDK)展示了交易的结构体表示:
pub struct Transaction {
    pub signatures: Vec<Signature>,
    pub message: Message,
}
交易消息(Transaction Message)
交易消息包含待执行的指令列表,以及所有指令所需访问账户公钥的并集。此外,它还包含运行时所需的其他数据,例如最近的区块哈希(recent blockhash)和消息头(message header)。
pub struct Message {
    pub instructions: Vec<Instruction>,
    pub account_keys: Vec<Address>,
    pub recent_blockhash: Hash,
    pub header: MessageHeader,
}
各组成部分详解如下:
指令(Instructions):每条指令是对链上程序的一次调用。一条指令包含三个部分:
程序 ID(Program ID):被调用程序的地址,其中包含该指令的业务逻辑。
账户(Accounts):指向交易消息中账户公钥列表的索引。这些索引将指令与其需要读取或写入的具体账户关联起来。
指令数据(Instruction Data):一个字节数组,用于指定要调用程序中的哪个函数,以及该函数所需的参数。
账户公钥列表(Account Keys):这是所有指令所引用账户公钥的并集。
最近区块哈希(Recent Blockhash):一个近期生成的区块哈希,用于将交易绑定到一个短暂的时间窗口(slot 范围),防止重放攻击。
消息头(Message Header):指明有多少个账户签署了该交易,以及哪些账户是只读的、哪些是可写的。
指令结构体(Instruction Struct)
以下是来自 Solana GitHub 源码中的 Instruction 结构体定义:
pub struct Instruction {
    /// Pubkey of the program that executes this instruction.
    pub program_id: Pubkey,
    /// Metadata describing accounts that should be passed to the program.
    pub accounts: Vec<AccountMeta>,
    /// Opaque data passed to the program for its own interpretation.
    pub data: Vec<u8>,
}

pub struct AccountMeta {
    /// An account's public key.
    pub pubkey: Pubkey,
    // True if the instruction requires a signature for this pubkey
    /// in the transaction's signatures list.
    pub is_signer: bool,
    /// True if the account data or metadata may be mutated during program execution.
    pub is_writable: bool,
}
每条指令所使用的每个账户都由 AccountMeta 类型表示,其中包含账户的公钥,以及是否为签名者(signer)和是否可写(writable)的标志位。
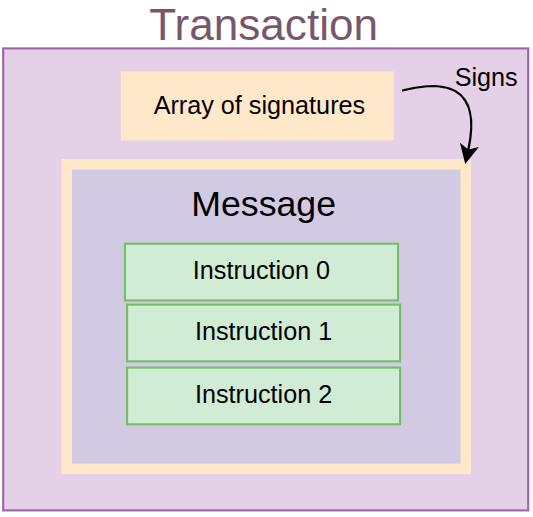
交易与指令关系总结
综合来看,下图展示了交易、消息和指令之间的关系:
一笔 交易(Transaction) 包含一组签名和一个消息(Message)。
消息(Message) 包含一个消息头、账户公钥列表、最近区块哈希,以及一组指令。
每条 指令(Instruction) 包含程序 ID、所使用的账户(这些账户以索引形式指向消息中的账户公钥列表),以及指令数据。
通过指令 Sysvar 实现内省
接下来,我们通过 Solana 的 Sysvar 账户来了解内省是如何工作的。
Sysvar 是一种特殊的只读账户,其中包含由 Solana 运行时动态维护的数据,用于向程序暴露网络内部状态。我们实际上是直接从该账户读取数据——而不是通过跨程序调用(CPI)去调用某个程序。
本系列前一篇文章已介绍过多种 Sysvar 类型。如需深入了解,请阅读《Solana Sysvars 详解》。
指令内省利用 instruction Sysvar 账户 来访问当前交易中所有指令的序列化向量(包括 program_id、accounts 和 data)。例如,在包含多条指令的交易中,某个程序不仅可以读取自身对应的指令,还能读取并分析交易中的任意其他指令。
下图动画展示了一个内省场景:当指令 1 正在执行时,其所属程序可以读取指令 2 和指令 3 的内容。
与 Solana 中的普通账户不同,instruction Sysvar 账户不会持久化存储数据;它仅在交易执行期间存在,一旦交易完成就会被清除。
instruction Sysvar 账户的地址是:Sysvar1nstructions1111111111111111111111111。该账户包含当前交易中所有指令的序列化列表,每条记录都包括程序 ID、账户列表和指令数据(如前所述)。以下是每条反序列化后指令对应的 Rust 结构体(前文已展示):
pub struct Instruction {
    /// Pubkey of the program that executes this instruction
    pub program_id: Pubkey,

    /// Metadata describing accounts that should be passed to the program
    pub accounts: Vec<AccountMeta>,

    /// Opaque data passed to the program for its own interpretation
    pub data: Vec<u8>,
}
Solana Rust SDK 提供了多个辅助函数,用于访问 instruction sysvar 账户中的序列化指令。不过,SDK 并未提供一个能一次性返回所有指令的函数,而是仅提供了按指定索引反序列化单条指令的函数。
你当然也可以手动读取并反序列化 sysvar 账户中的指令列表,但这种方式容易出错,因此建议使用 SDK 提供的函数进行反序列化。
以下是 Solana Rust SDK 为内省提供的两个关键辅助函数:
load_current_index_checked:程序可通过此函数获知自己在交易指令列表中的索引位置,从而根据相对位置查找其他指令。
load_instruction_at_checked:加载指定索引处的指令,并将其反序列化为 Instruction 结构体。一旦通过 load_current_index_checked 获取了当前指令的索引,就可以使用此函数来内省前面或后面的指令。我们将在本文后续章节中演示具体用法。
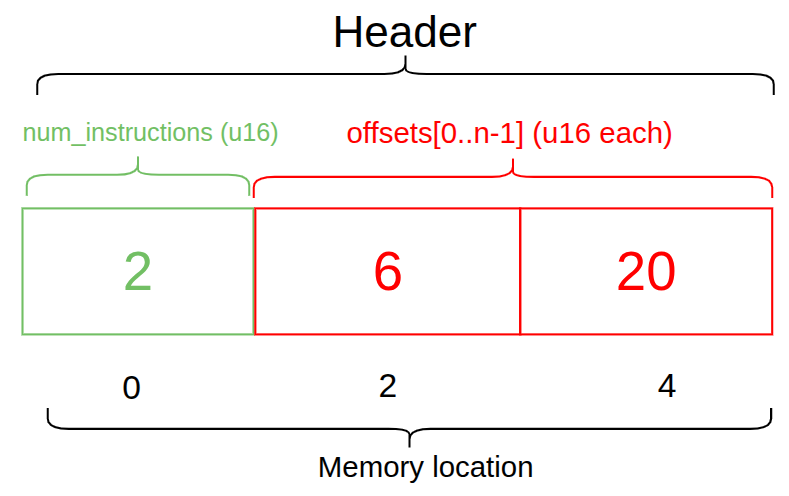
首先,为了理解这些辅助函数的工作原理,我们来看一下 instruction sysvar 账户的内部布局。它分为三个区域:
头部(Header)
指令列表(Instructions)
当前正在执行的指令索引(Index of the currently executing instruction)
1.头部区域
头部指定了交易中指令的数量以及指令偏移量(指向指令开始的位置)。下图展示了一个包含两条指令的交易的头部,因此有两个偏移量:一个从内存位置 6 开始,另一个从内存位置 20 开始。
2.指令区域
指令区域从偏移量所指示的字节位置开始(下图中的红色框仅为偏移量的视觉标记,并非实际内存位置)。从该位置起,它包含账户元数据、程序 ID、指令数据的长度,最后是指令数据本身。如果有多条指令,此结构会为每条指令重复一次。

3.当前正在执行的指令索引
最后,当前正在执行的指令的索引存储在 Sysvar 布局的末尾。

如果程序知道当前正在执行的指令的索引,就可以相对于该索引获取其他指令。
访问指令
现在我们已经了解了 Sysvar 账户中数据的布局方式,接下来看一个实际示例。我们将使用两个用于内省的辅助方法:load_current_index_checked 和 load_instruction_at_checked,来访问交易中的指令。为本文目的,我们将使用一个基本的转账交易。
我们的示例程序将验证一条系统转账指令是否在其自身指令之前。只有满足此条件,交易才会成功。
Transaction:
├── Instruction 0: System Transfer (user pays X lamports)
└── Instruction 1: This program (verifies the payment)
设置程序
若要跟随操作,你应该已设置好 Solana 开发环境;如果尚未设置,请阅读本系列的第一篇文章。
初始化一个新的 Anchor 应用:
anchor init instruction-introspection
更新 program/src/Cargo.toml 中的依赖项以包含 bincode(bincode=1.3.3)。我们将使用 bincode 库来反序列化系统指令:
//... rest of toml file content

[dependencies]
anchor-lang = "0.31.1"
**bincode = "1.3.3" # add this**
我们将为此项目使用 Devnet。在根目录创建一个 .env 文件,并添加以下 provider 和钱包导出:
export ANCHOR_PROVIDER_URL=https://api.devnet.solana.com
export ANCHOR_WALLET=~/.config/solana/id.json
同时更新 Anchor.toml 文件以使用 devnet 的 provider 和钱包。
[provider]
cluster = "https://api.devnet.solana.com"
wallet = "~/.config/solana/id.json"
此外,由于你需要一些 SOL 来支付 Devnet 上的费用,请运行 solana airdrop 2 以获取 2 SOL,这对本示例已绰绰有余。
导入
现在,我们将导入本示例所需的 Anchor 依赖项,以替换 program/src/lib.rs 文件中的代码。特别地,我们从 sysvar::instructions 导入 load_instruction_at_checked 和 load_current_index_checked:
use anchor_lang::prelude::*;
use anchor_lang::solana_program::{
         system_program,
         sysvar::instructions::{
                load_instruction_at_checked,
                load_current_index_checked
         },
         system_instruction::SystemInstruction,
};
然后我们将声明程序 ID 并添加一个 verify_transfer 函数,该函数将:
获取当前指令索引,以了解当前正在执行的交易的位置;
使用链上 Solana Rust SDK 反序列化 sysvar 账户中的指令列表,加载前一条指令;
通过检查程序 ID 是否匹配系统程序来验证所加载的指令是否为系统转账指令,然后解析指令数据以确认转账金额符合预期;
验证该指令涉及的账户数量为 2;
最后,我们将定义 sysvar 账户的结构体。
完整代码如下。我们已添加注释以说明上述步骤:
use anchor_lang::prelude::*;
use anchor_lang::solana_program::{
    system_program,
    sysvar::instructions::{load_instruction_at_checked, load_current_index_checked},
    system_instruction::SystemInstruction,
};

declare_id!("BxQuawTcvJkT2JM1qKeW6wyM4i5VCuM122v9tVsSrmwm");

#[program]
pub mod check_transfer {
    use super::*;

    pub fn verify_transfer(ctx: Context<VerifyTransfer>, expected_amount: u64) -> Result<()> {
        // Step 1: Get current instruction index to understand our position
        **let current_ix_index = load_current_index_checked(&ctx.accounts.instruction_sysvar)?;**
        msg!("Currently executing instruction index: {}", current_ix_index);

        // Step 2: Load the previous instruction
        let transfer_ix = load_instruction_at_checked(
            (current_ix_index - 1) as usize,
            &ctx.accounts.instruction_sysvar
        ).map_err(|_| error!(ErrorCode::MissingInstruction))?;

        // Step 3:  Verify it's a system program instruction
        require_keys_eq!(transfer_ix.program_id, system_program::ID, ErrorCode::NotSystemProgram);

        // Step 4: Parse the system instruction data
        let system_ix = bincode::deserialize(&transfer_ix.data)
            .map_err(|_| error!(ErrorCode::InvalidInstructionData))?;

        match system_ix {
            SystemInstruction::Transfer { lamports } => {
                require_eq!(lamports, expected_amount, ErrorCode::IncorrectAmount);
                msg!("✅ Verified transfer of {} lamports", lamports);
            }
            _ => return Err(error!(ErrorCode::NotTransferInstruction)),
        }

        // Step 5: Verify accounts involved in the transfer
        require_gte!(transfer_ix.accounts.len(), 2, ErrorCode::InsufficientAccounts);

        let from_account = &transfer_ix.accounts[0];
        let to_account = &transfer_ix.accounts[1];

        require!(from_account.is_signer, ErrorCode::FromAccountNotSigner);
        require!(from_account.is_writable, ErrorCode::FromAccountNotWritable);
        require!(to_account.is_writable, ErrorCode::ToAccountNotWritable);

        msg!("✅ Transfer accounts properly configured");
        msg!("From: {}", from_account.pubkey);
        msg!("To: {}", to_account.pubkey);

        Ok(())
    }
}

#[derive(Accounts)]
pub struct VerifyTransfer<'info> {
    /// CHECK: This is the instruction sysvar account
    #[account(address = anchor_lang::solana_program::sysvar::instructions::ID)]
    pub instruction_sysvar: AccountInfo<'info>,
}
以下是我们使用的错误代码,你应该将其添加到同一文件中:
#[error_code]
pub enum ErrorCode {
    /// Thrown when attempting to load an instruction at an index that doesn't exist
    /// in the transaction (e.g., trying to access index -1 when current is 0)
    #[msg("Missing required instruction in transaction")]
    MissingInstruction,

    /// Thrown when the previous instruction's program_id doesn't match the System Program
    /// Ensures we're only validating actual system program instructions
    #[msg("Instruction is not from System Program")]
    NotSystemProgram,

    /// Thrown when bincode fails to deserialize the instruction data into SystemInstruction
    /// Indicates malformed or corrupted instruction data
    #[msg("Invalid instruction data format")]
    InvalidInstructionData,

    /// Thrown when the SystemInstruction variant is not Transfer
    /// (e.g., it's CreateAccount, Allocate, or another system instruction type)
    #[msg("Instruction is not a transfer")]
    NotTransferInstruction,

    /// Thrown when the actual lamports amount in the transfer doesn't equal expected_amount
    /// Protects against front-running or incorrect payment amounts
    #[msg("Transfer amount does not match expected amount")]
    IncorrectAmount,

    /// Thrown when the transfer instruction has fewer than 2 accounts
    /// A valid transfer requires at least [from, to] accounts
    #[msg("Transfer instruction has insufficient accounts")]
    InsufficientAccounts,

    /// Thrown when the 'from' account in the transfer didn't sign the transaction
    /// Prevents unauthorized transfers
    #[msg("From account is not a signer")]
    FromAccountNotSigner,

    /// Thrown when the 'from' account is not marked as writable
    /// Required because the account balance will be debited
    #[msg("From account is not writable")]
    FromAccountNotWritable,

    /// Thrown when the 'to' account is not marked as writable
    /// Required because the account balance will be credited
    #[msg("To account is not writable")]
    ToAccountNotWritable,
}
在上述代码中,我们获取了当前指令索引,并使用该索引加载前一条指令进行检查。由于指令是按顺序排列的,我们只需将当前索引减 1 即可加载前一条指令。
现在,让我们构建、部署程序,并使用 JavaScript 与其交互。
运行 anchor build && anchor deploy 以构建和部署项目。你应该看到类似如下的输出,表明部署成功:

使用 TypeScript 与程序代码交互
创建一个简单的 TypeScript 脚本,通过我们的程序向一个地址转账 1 SOL。
要直接运行 TypeScript 文件,你将使用 bun.js。如果你尚未安装,可以在终端运行 curl -fsSL https://bun.sh/install | bash 进行安装。
创建一个 scripts/ 文件夹,添加一个 introspect.ts 文件,并将以下代码粘贴进去。我已添加注释以帮助你理解代码中的逻辑流程。
import * as anchor from "@coral-xyz/anchor";
import { Program } from "@coral-xyz/anchor";
import { SystemProgram, SYSVAR_INSTRUCTIONS_PUBKEY, Transaction, Keypair } from "@solana/web3.js";
import { CheckTransfer } from "../target/types/check_transfer";
async function main() {
console.log("🚀 Starting verification script...");
// --- Setup Connection and Program ---
// Configure the client to use the local cluster.
const provider = anchor.AnchorProvider.env();
anchor.setProvider(provider);
// Load the Anchor program from the workspace.
const program = anchor.workspace.CheckTransfer as Program<CheckTransfer>;
// --- Prepare Accounts and Data ---
// The 'payer' is the wallet that signs and pays for the transaction.
const payer = provider.wallet.publicKey;
// A new, random keypair to act as the recipient.
const recipient = Keypair.generate().publicKey;
// Define the transfer amount using anchor.BN for u64 safety.
const transferAmount = new anchor.BN(1_000_000_000); // 1 SOL
console.log(`- Payer: ${payer}`);
console.log(`- Recipient: ${recipient}`);
console.log(`- Amount: ${transferAmount.toString()} lamports`);
// --- Build the Transaction ---
// A transaction is a container for one or more instructions.
const tx = new Transaction();
// Instruction 0: The System Program Transfer.
// This must immediately precede our program's instruction.
tx.add(
SystemProgram.transfer({
fromPubkey: payer,
toPubkey: recipient,
lamports: transferAmount.toNumber(), // Safe for 1 SOL
})
);
// Instruction 1: Our program's verification instruction.
tx.add(
await program.methods
.verifyTransfer(transferAmount)
.accounts({
instructionSysvar: SYSVAR_INSTRUCTIONS_PUBKEY,
})
.instruction()
);
// --- Send Transaction and Verify Outcome ---
try {
const sig = await provider.sendAndConfirm(tx);
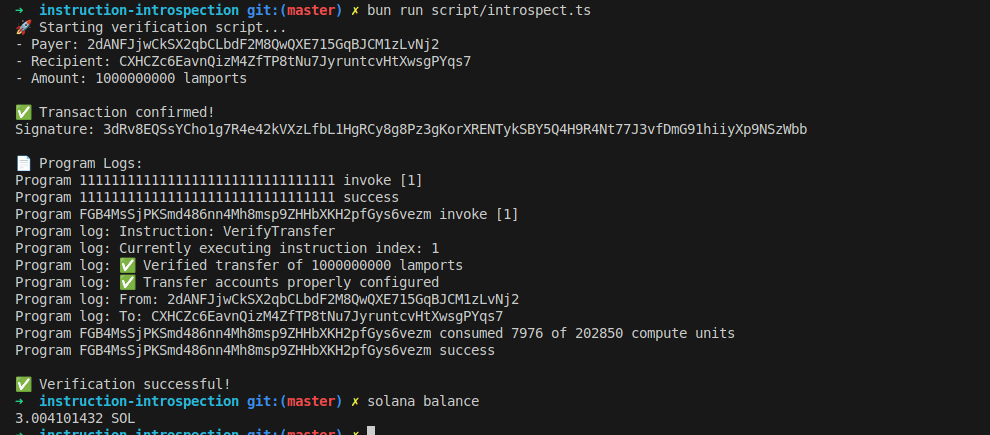
console.log("\n✅ Transaction confirmed!");
console.log(`Signature: ${sig}`);
// Fetch the transaction details to inspect the logs.
const txInfo = await provider.connection.getTransaction(sig, {
commitment: "confirmed",
maxSupportedTransactionVersion: 0,
});
console.log("\n📄 Program Logs:");
console.log(txInfo?.meta?.logMessages?.join("\n"));
// Check for the success message in the logs.
const logs = txInfo?.meta?.logMessages;
if (!logs || !logs.some(log => log.includes(`Verified transfer of ${transferAmount} lamports`))) {
throw new Error("Verification log message not found!");
}
console.log("\n✅ Verification successful!");
} catch (error) {
console.error("\n❌ Transaction failed!");
console.error(error);
process.exit(1); // Exit with a non-zero error code
}
}
// --- Script Entrypoint ---
main().then(
() => process.exit(0),
err => {
console.error(err);
process.exit(1);
}
);
当我们使用 bun run scripts/introspect.ts 运行客户端代码时,应看到类似如下的成功输出:
指令内省的注意事项:检查时避免使用绝对索引
从 sysvar 账户中通过绝对索引(例如 0)加载指令,可能允许攻击者在多次调用中复用该指令。
例如,如果你的程序要求用户在同一笔交易中先向你的金库转账再提现,使用绝对索引可能让攻击者在索引 0 处放置一次转账,然后进行多次提现,而所有提现都会验证通过,因为它们都引用了同一笔转账。
相反,应使用相对指令索引,以确保转账紧邻发生在提现指令之前,正如我们在前面示例中所展示的那样。
 let transfer_ix = load_instruction_at_checked(
    (current_ix_index - 1) as usize,
     &ctx.accounts.instruction_sysvar
     )
这可确保被检查的指令是当前提现对应的正确转账,而不是交易中更早位置被复用的转账。
原文:https://rareskills.io/post/solana-instruction-introspection
免责声明:本文为c2e Labs的第三方内容,仅供信息分享与传播之目的,不代表我们的立场或观点且不构成任何投资及应用建议。版权归原作者或来源方所有,如内容或素材有所争议请和我们取得联系。
